Give your robot an appearance you can recognize in traffic. This appendix adds a red-and-cream Tutorial B paint scheme, number-8 badges, and a matching pit sign to the complete Appendix A driver. You will edit artwork, export game images, install them, and check the result from several cameras.
You will learn to:
Build using the Linux instructions or Windows instructions. The download is a complete source folder, including the editable artwork and ready-to-use images:
Download tutorialb.zip — complete driver and editable artwork
Extract tutorialb under src/drivers/ in your configured TORCS source tree. No graphics editor is needed to build or run the supplied checkpoint. Select Tutorial B, CG Speedway number 1 (g-track-1), and a six-lap Quick Race with normal graphics. Begin without opponents. The driver still starts with a full tank and uses Chapter 6's fuel/damage strategy, without a forced demonstration stop.
Look for cream side panels, a dark number 8, red bodywork, and TUTORIAL B on the rear wing. The assigned pit wall should carry the matching sign. Use F3 for car views, F4 for side views, and F5/F6 for overhead/perspective views. Repeated presses cycle the available views within a group. > zooms in and < zooms out; * restores the camera's default zoom. P pauses for an inspection, and F1 shows the current controls.
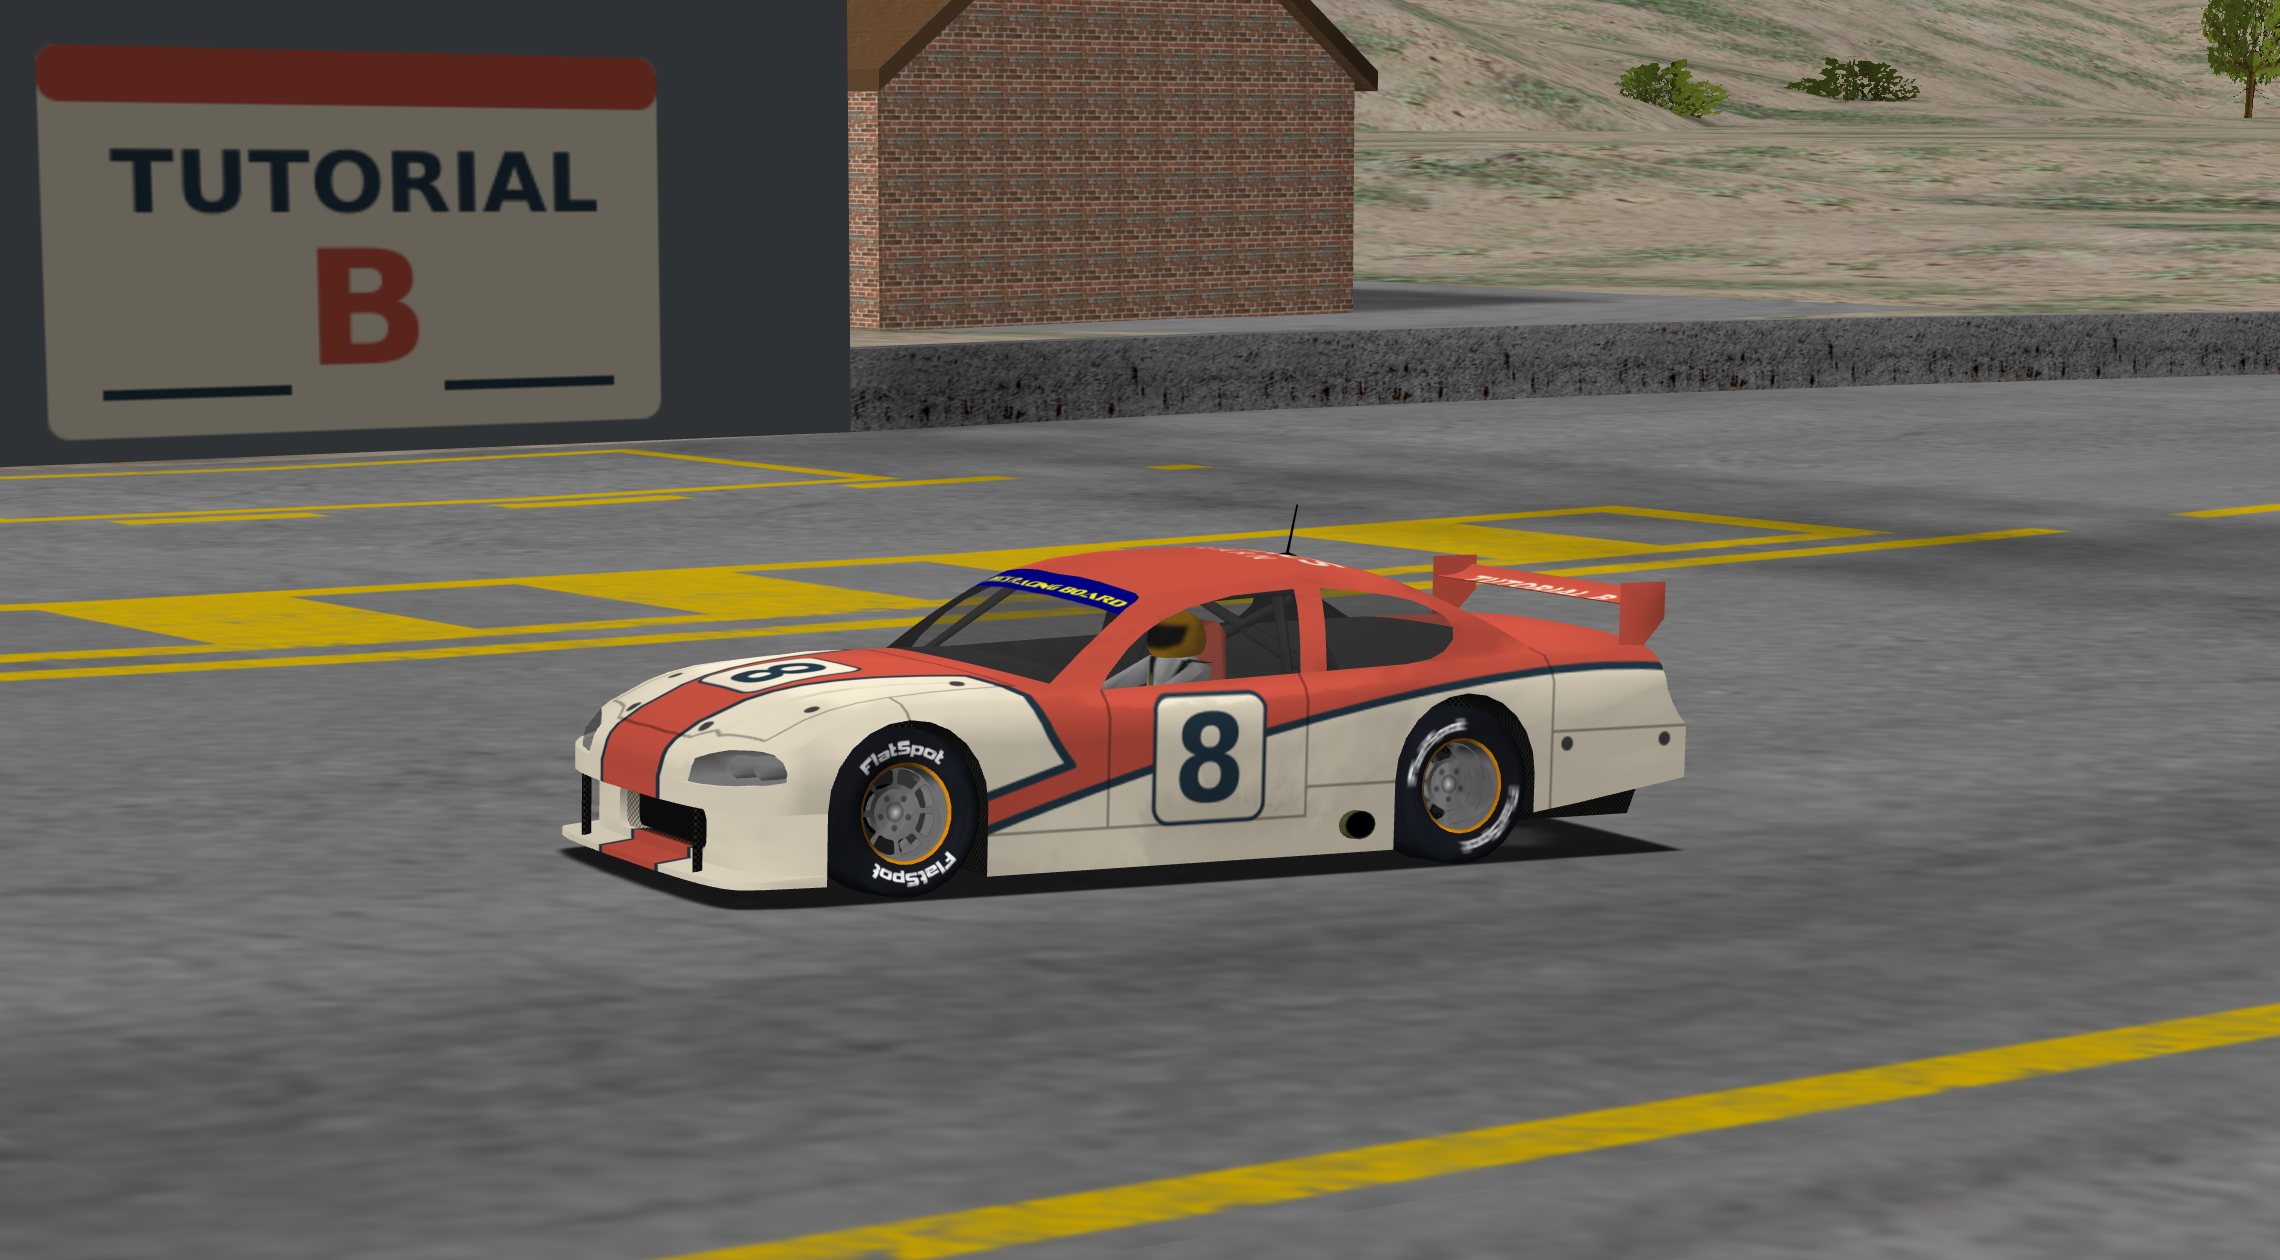
Tutorial B's number-8 car and matching pit sign. Click the image to enlarge it.
The car's handling, recovery, traffic, and pit algorithms are inherited from Appendix A. The new module name also gives it its own configuration directory and private XML section, Tutorial B. The artwork itself changes no physics parameters.
Inside your src/drivers/tutorialb working copy:
| File | Purpose |
|---|---|
| artwork/livery.xcf | Layered GIMP source: body paint, side panels, details, glass, decals, and a hidden UV guide |
| artwork/decals.svg | Editable vector number badges and lettering used to make the XCF's decal layer |
| artwork/logo.svg | Editable vector source for the pit sign |
| car1-stock1.rgb | Exported 1024 × 1024 car texture, four channels: red, green, blue, alpha |
| logo.rgb | Exported 256 × 256 opaque pit-logo texture, three colour channels |
| tutorialb.xml | Driver description; its race-number entry is not a painting operation |
| default.xml, g-track-1.xml | Car setup and private driver parameters from Appendix A |
| ARTWORK.txt | Artwork authorship, source, modifications, and Free Art License notice |
An XCF preserves layers for further painting. An SVG preserves vector shapes and text. The runtime SGI image stores the resulting pixels, not those editing layers. Save your editable source before exporting the runtime image.
The decal SVG is a separate editing source: changing it does not automatically update either the XCF's imported decal layer or car1-stock1.rgb. The explicit replacement step is described below.
A car mesh has texture coordinates, often called UV coordinates, attached to its surface vertices. They say which part of the flat image is sampled on each polygon. An atlas puts several surface regions into one image. Its separated regions are often called islands; their boundaries do not necessarily coincide with the edges of an obvious painted panel.
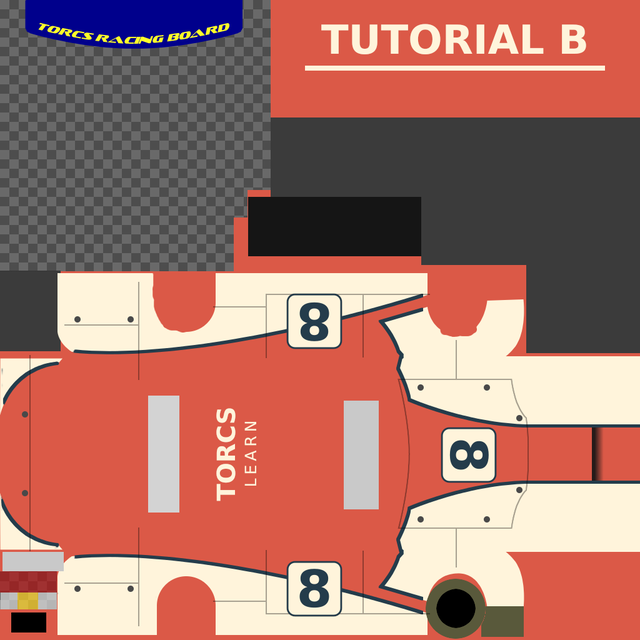
The atlas is derived from the stock car's artwork; see artwork credits. The image layout is not a top-down photograph of the car.
For this particular atlas, the large central area between the window strips maps to the roof. The number near the right-hand end maps to the bonnet. The two side badges are rotated differently in the image so they appear upright on their respective sides. A rear-wing region is separate near the top. Do not reuse these positions for a different car model without checking its mapping.
Open artwork/livery.xcf in GIMP. Temporarily show the layer named UV guide — HIDE BEFORE EXPORT to inspect the mapped boundaries. Hide it again before exporting. Keep the image at 1024 × 1024, and avoid moving the underlying details and window regions. Moving a painted region does not move the mesh's UVs.
For another car, look in data/cars/models/<car>/ in the source tree. A supplied layered XCF is a useful starting point; otherwise open its existing texture and save a layered working copy. Check the model and the adjacent artwork attribution. The installed data uses cars/<car>/, without the source tree's models component.
For the reference car, car1-stock1.xml selects car1-stock1.acc under Graphic Objects/Ranges/1. That model asks for car1-stock1.rgb as its body texture. The renderer does not infer a new filename from the robot's name, and it does not search for tutorialb.rgb merely because the module is named Tutorial B.
The model also uses separate detail textures. This checkpoint replaces the body image while letting those other files come from the stock car. XML colour fields used for display identification likewise do not recolour this model's body image.
The game image has a .rgb filename even though it contains an alpha channel. The SGI header describes its channels. Do not rename it .rgba: the model still asks for the .rgb filename. Do not flatten the car onto an opaque background; that would destroy the window transparency. If the editor needs to combine layers for export, preserve their composite alpha.
No C++ compilation is needed after painting. The same platform install commands copy the new image. An edit to the XCF alone is not enough: save source → export SGI → leave session → install → start new session. Pausing keeps the current textures in memory rather than reloading them.
Open artwork/decals.svg in Inkscape or another SVG editor. The side badges, bonnet badge, wing lettering, and roof lettering are separate groups. Edit the text while retaining each group's placement and rotation. Keep generous space inside the badges and away from texture seams.
The three number badges are linked copies of one badge definition. To change all three together, open the SVG in a text editor, find the single 8 between the <text> and </text> tags inside that definition, and replace it with 9. Keep the surrounding attributes and the three <use> elements unchanged; their transforms place and rotate the copies. The wing and roof lettering are separate text objects that you can edit directly in the SVG editor.
Export a 1024 × 1024 transparent PNG of the whole page, not a cropped drawing or selection. In GIMP, hide the old Number 8 and lettering — source: decals.svg layer and open the new PNG as a layer at the image origin. It must cover the same 1024 × 1024 canvas without scaling or an offset. Save the XCF and export the car texture again. Exported lettering is pixels, so TORCS does not need the font used by your editor. If a font is substituted while editing, recheck the text width.
If you change the painted number to 9, you may also update race number in tutorialb.xml for consistent identification. These remain two separate edits: changing the XML number never draws a new number into an existing texture.
GIMP can export Silicon Graphics Image (SGI) files. Choose that format when exporting the .rgb filename. For the supplied car, retain RGB colour mode with an alpha channel and 8-bit integer channel precision. For the opaque logo, flatten against its intended wall-colour background and export RGB, also at 8-bit precision. Do not use indexed colour or a 16-bit-per-channel export for this exercise.
Changing a PNG's extension to .rgb is not format conversion. If the file is still encoded as PNG, it is not the image expected by the SGI loader. Open the exported file again in the editor as a quick check of its dimensions, appearance, and transparency.
The current SGI texture loader requires power-of-two dimensions on both axes: for example 256, 512, or 1024 pixels. The image need not be square in every use, but keep the supplied 1024 × 1024 car and 256 × 256 logo dimensions while learning. RLE is SGI's optional lossless storage compression; it is not a JPEG quality setting. The supplied exports use uncompressed SGI, which the loader also supports.
Retain enough detail for the close view, but also inspect the car from farther away. Small text can disappear as the renderer reduces the texture for distant views. Bigger source images do not fix a poorly positioned badge or a label that crosses a UV seam.
For the reference car's model-loaded body texture, the current renderer searches:
The first matching file wins. These are installed data paths, relative to the game's data-directory context. On Windows Release, the corresponding directory is under runtime/. On Linux, use the destination printed by make install. These image files belong with game data, not in the separate Linux directory containing the compiled .so module.
The 1 is the robot's exported driver index, reflected in Robots/index/1 in tutorialb.xml. It is not the car's starting-grid position or its zero-based position in the race's car array. This checkpoint puts the image in the module directory, which also provides a useful default for later robots.
Leave the stock car's image in place: the final fallback lets other drivers retain their normal appearance. More-specific leftover files can hide a newly installed module-level image, so inspect the index directory when an update seems ignored.
This list describes the model body texture, not every renderer resource. For example, the wheel-texture helper has additional car-name subdirectories in its search path. Do not assume that a path which works for one resource is searched for all the others. The appendix's module-level placement works for the two files we are demonstrating.
Open artwork/logo.svg and edit the main message. The source is a full 256 × 256 square with a constant grey perimeter. Export the entire page as a 256 × 256 PNG, open it in GIMP, flatten it against its opaque background, and export SGI RGB as logo.rgb in the working folder. Save the editable SVG separately.
The current side-pit renderer maps the wall using texture coordinates u = −0.7 to 1.3 across its width and v = 0.33 to 1.1 from bottom to top. It requests non-repeating texture sampling. Coordinates beyond the image stretch the edge appearance instead of tiling copies of the sign.
In an image editor, the origin is usually at the top left. In the texture's vertical coordinate, v = 1 corresponds to the top. Thus the wall uses roughly the top 67% of the image: about the top 172 rows of a 256-pixel image, or 86 rows of a 128-pixel image. The lower third is not sampled on this wall. Keep important lettering comfortably inside that top area rather than on its boundary.
Use a uniform perimeter colour. A one-pixel perimeter establishes the edge texels; the supplied design also leaves a larger margin around the lettering to avoid filtering a bright detail into the surrounding wall. Do not place a colourful letter or stripe against the outermost edge unless you intend it to extend outward. The mapped wall can stretch the artwork, so the final judgment belongs in the simulator, not just in the square editor preview.
The source includes a small mark in the unused lower third, but it has no promised role in driver selection or race results. This is a pit-wall texture, not a general team-emblem registration API. Tracks without this side-pit geometry will not show the sign in the same way.
For a side pit assigned to one car, the renderer searches:
For multiple cars assigned to the same pit, it skips the individual index directory. It uses the module of the first car assigned to that pit, then the same global fallbacks. That is why a module-level logo.rgb is the right baseline for a team sign. Sharing depends on pit assignment and the race's cars-per-pit setting, not simply on having several opponents in the race.
Pit assignment, a driver's registration index, and an image filename are separate concepts. Painting a sign neither reserves a different pit box nor changes the service logic. Appendix C develops multiple registered robots and independent per-robot state.
Start a new graphical session after installing each exported change. Check:
| View or observation | What it tells you |
|---|---|
| Both side views | Numbers are upright, seams join sensibly, and one side is not accidentally mirrored |
| Roof/bonnet view | Lettering stays inside the intended mapped regions |
| Close view through the windows | Composite alpha was preserved; paint has not covered the glass |
| Distant car view | The main colour and number remain recognizable |
| Assigned pit wall | Correct sign, readable message, and a uniform surrounding wall |
| A different driver using the same car | Your module-level override did not replace the shared stock image |
Try one deliberate experiment: change the body paint to blue or green while keeping the cream panels, then reload the session. Restore the supplied red after confirming the change. Next change the large letter on the pit sign and repeat. Treat paint and logo as separate exports so a mistake is easy to locate.
When the appearance is correct, restore the supplied configuration and complete the six-lap race. Check the paint from the car and trackside cameras as it drives.
| Symptom | Check |
|---|---|
| Still seeing the stock paint | Exact model-requested filename, installed data destination, module name, and new session |
| New module-level image has no effect | A drivers/tutorialb/1/ override may be taking precedence |
| XCF or SVG edit has no effect | Export the runtime SGI file; for decal SVG edits also replace the imported XCF layer |
| Missing, distorted, or rejected texture | Verify real SGI encoding, 8-bit channels, dimensions, and filename case |
| Opaque or strangely coloured windows | Restore the source alpha and avoid flattening the car onto a solid background |
| Text is reversed, clipped, or painted across a window | Check the UV guide, group rotation, full-page export, and layer offset |
| All cars changed appearance | You may have replaced the stock image under cars/car1-stock1 |
| Pit message is cut off | Keep it in the top two-thirds and allow margins for the wall mapping |
| Pit wall has streaks or unusual borders | Inspect the image's perimeter colour and transparency |
| Wrong sign when sharing a pit | The shared pit uses the first assigned car's module-level logo, not its individual logo |
| Image remains old while paused | End the session and begin another; pausing does not invalidate the texture cache |
| An added image is absent after installation | Add it to the Linux SHIP list and Windows installation Copy list |
No module rebuild is needed for image-only edits. If you edit installed images directly, remember that the next installation replaces them from your working copy. Preserve your editable sources and exports there.
You are finished when you can install the supplied appearance, make and verify one car-paint edit and one pit-logo edit, explain the lookup order, and restore the baseline. Keep your XCF and SVG sources with the final exported files and ARTWORK.txt when sharing the result.
Continue with Appendix C — Multiple Robots in One Module, or return to the Robot Tutorial.
 1.14.0